If application is not building and give error.
To check which file create error in Xcode and not being identify than use
To see which files are causing this error, run this command in Terminal:
$ xattr -lr <path_to_app_bundle .app>
You can also remove all extended attributes from your app bundle with the xattr command:
$ xattr -cr <path_to_app_bundle .app>

iPhone Rider, Ride it and Enjoy it
Saturday, September 21, 2019
Friday, May 23, 2014
Import music and save it to Document Directory in ios
Here we will select music from music album and save it to Document Directory.
Let Start
1. Create Project.
2. Take button and initialize it.
3. Import MediaPlayer.framework.
Before that first add Framework.
4. On button click open media album to select music.
5. on Media player Delegate method, import music and save it to Document Directory
Let Start
1. Create Project.
2. Take button and initialize it.
3. Import MediaPlayer.framework.
#import <MediaPlayer/MediaPlayer.h>
4. On button click open media album to select music.
- (IBAction)btnMedia_clicked:(id)sender {
MPMediaPickerController *mediaPicker = [[MPMediaPickerController alloc] initWithMediaTypes:MPMediaTypeMusic];
mediaPicker.delegate = self;
mediaPicker.allowsPickingMultipleItems = NO;
mediaPicker.prompt = @"Select songs to play";
// UINavigationController *navi=[[UINavigationController alloc] initWithRootViewController:mediaPicker];
[self presentViewController:mediaPicker animated:YES completion:Nil];
[mediaPicker release];
}
5. on Media player Delegate method, import music and save it to Document Directory
- (void) mediaPicker: (MPMediaPickerController *) mediaPicker didPickMediaItems: (MPMediaItemCollection *) mediaItemCollection
{
[self dismissViewControllerAnimated:YES completion:nil];
if (mediaItemCollection) {
MPMediaItem *song=[[[mediaItemCollection items] objectAtIndex:0] retain];
if (! song) {
return;
}
NSURL *assetURL = [song valueForProperty:MPMediaItemPropertyAssetURL];
AVURLAsset *songAsset = [AVURLAsset URLAssetWithURL:assetURL options:nil];
NSLog (@"Core Audio %@ directly open library URL %@",
coreAudioCanOpenURL (assetURL) ? @"can" : @"cannot",
assetURL);
NSLog (@"compatible presets for songAsset: %@",
[AVAssetExportSession exportPresetsCompatibleWithAsset:songAsset]);
/* approach 1: export just the song itself
*/
AVAssetExportSession *exporter = [[AVAssetExportSession alloc]
initWithAsset: songAsset
presetName: AVAssetExportPresetAppleM4A];
NSLog (@"created exporter. supportedFileTypes: %@", exporter.supportedFileTypes);
exporter.outputFileType = @"com.apple.m4a-audio";
// exporter.outputFileType=@"com.apple.quicktime-movie";
NSString *exportFile = [myDocumentsDirectory() stringByAppendingPathComponent: @"exported.m4a"];
myDeleteFile(exportFile);
NSURL *exportURL = [[NSURL fileURLWithPath:exportFile] retain] ;
exporter.outputURL = exportURL;
// do the export
[exporter exportAsynchronouslyWithCompletionHandler:^{
int exportStatus = exporter.status;
switch (exportStatus) {
case AVAssetExportSessionStatusFailed: {
// log error to text view
NSError *exportError = exporter.error;
NSLog (@"AVAssetExportSessionStatusFailed: %@", exportError);
//errorView.text = exportError ? [exportError description] : @"Unknown failure";
// errorView.hidden = NO;
break;
}
case AVAssetExportSessionStatusCompleted: {
NSLog (@"AVAssetExportSessionStatusCompleted");
// fileNameLabel.text = [exporter.outputURL lastPathComponent];
// set up AVPlayer
//[self setUpAVPlayerForURL: exporter.outputURL];
// [self enablePCMConversionIfCoreAudioCanOpenURL: exporter.outputURL];
break;
}
case AVAssetExportSessionStatusUnknown: { NSLog (@"AVAssetExportSessionStatusUnknown"); break;}
case AVAssetExportSessionStatusExporting: { NSLog (@"AVAssetExportSessionStatusExporting"); break;}
case AVAssetExportSessionStatusCancelled: { NSLog (@"AVAssetExportSessionStatusCancelled"); break;}
case AVAssetExportSessionStatusWaiting: { NSLog (@"AVAssetExportSessionStatusWaiting"); break;}
default: { NSLog (@"didn't get export status"); break;}
}
}];
}
}
-(void)mediaPickerDidCancel:(MPMediaPickerController *)mediaPicker
{
[self dismissViewControllerAnimated:YES completion:nil];
}
IT will import song and put it on document directory
Thursday, May 22, 2014
Manage Two Tableview in ios Xcode
On click UITableview cell Effect other UITableview cell
Example. when one click on 6th row of one tableview cell move cell of Second tableview to 60th row.
It like 1 -> 10,2 -> 20,3 -> 30 etc.
Now continue with code.
1. Take two Tableview side by side on viewController.
2. Initialize it.
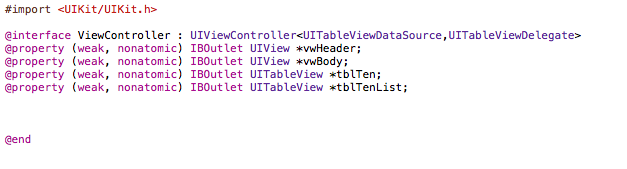
3. Set Delegate and Datasource to fileOwner.
 4. on select row set scroll position of second tableview to particular cell.
-(NSInteger)numberOfSectionsInTableView:(UITableView *)tableView
{
return 1;
}
-(NSInteger)tableView:(UITableView *)tableView numberOfRowsInSection:(NSInteger)section
{
if(tableView==self.tblTen)
return 10;
else if(tableView==self.tblTenList)
return 100;
return 0;
}
-(UITableViewCell *)tableView:(UITableView *)tableView cellForRowAtIndexPath:(NSIndexPath *)indexPath
{
static NSString *cellStr=@"clsten";
ClsTen *cellTen=(ClsTen *)[tableView dequeueReusableCellWithIdentifier:cellStr];
if(cellTen==nil)
{
NSArray *nib=nil;
nib=[[NSBundle mainBundle] loadNibNamed:@"clsTen" owner:self options:nil];
cellTen=[nib objectAtIndex:0];
cellTen.backgroundColor=[UIColor clearColor];
}
cellTen.lblNo.text=[NSString stringWithFormat:@"%ld",indexPath.row];
return cellTen;
}
-(void)tableView:(UITableView *)tableView didSelectRowAtIndexPath:(NSIndexPath *)indexPath
{
if(tableView==self.tblTen)
[[self tblTenList] scrollToRowAtIndexPath:[NSIndexPath indexPathForRow:indexPath.row * 10 inSection:0] atScrollPosition:UITableViewScrollPositionTop animated:YES];
if(tableView==self.tblTenList)
{
TenSubList *tenSubList=nil;
tenSubList=[[TenSubList alloc] initWithNibName:@"TenSubList_iPhone" bundle:nil];
[self.navigationController pushViewController:tenSubList animated:YES];
}
}
Result

When Click on 3rd cell, second cell move to 30

Example. when one click on 6th row of one tableview cell move cell of Second tableview to 60th row.
It like 1 -> 10,2 -> 20,3 -> 30 etc.
Now continue with code.
1. Take two Tableview side by side on viewController.
2. Initialize it.
3. Set Delegate and Datasource to fileOwner.
-(NSInteger)numberOfSectionsInTableView:(UITableView *)tableView
{
return 1;
}
-(NSInteger)tableView:(UITableView *)tableView numberOfRowsInSection:(NSInteger)section
{
if(tableView==self.tblTen)
return 10;
else if(tableView==self.tblTenList)
return 100;
return 0;
}
-(UITableViewCell *)tableView:(UITableView *)tableView cellForRowAtIndexPath:(NSIndexPath *)indexPath
{
static NSString *cellStr=@"clsten";
ClsTen *cellTen=(ClsTen *)[tableView dequeueReusableCellWithIdentifier:cellStr];
if(cellTen==nil)
{
NSArray *nib=nil;
nib=[[NSBundle mainBundle] loadNibNamed:@"clsTen" owner:self options:nil];
cellTen=[nib objectAtIndex:0];
cellTen.backgroundColor=[UIColor clearColor];
}
cellTen.lblNo.text=[NSString stringWithFormat:@"%ld",indexPath.row];
return cellTen;
}
-(void)tableView:(UITableView *)tableView didSelectRowAtIndexPath:(NSIndexPath *)indexPath
{
if(tableView==self.tblTen)
[[self tblTenList] scrollToRowAtIndexPath:[NSIndexPath indexPathForRow:indexPath.row * 10 inSection:0] atScrollPosition:UITableViewScrollPositionTop animated:YES];
if(tableView==self.tblTenList)
{
TenSubList *tenSubList=nil;
tenSubList=[[TenSubList alloc] initWithNibName:@"TenSubList_iPhone" bundle:nil];
[self.navigationController pushViewController:tenSubList animated:YES];
}
}
Result
When Click on 3rd cell, second cell move to 30
Sunday, August 4, 2013
Find latitude and longitude in iOS
Before starting coding, first add coreLocation framework in Application.
Now move to Coding part.
.h file
//kCLLocationAccuracyBestForNavigation;// use high level of accuracy including additinal sensor data,this level of accuracy is intended solely to use when device is connected with exteranl power supply.
// kCLLocationAccuracyBest -- highest level of accuracy for device running on batter power
locationManager.distanceFilter = 30.48f; //mts for 100 feet
[locationManager startUpdatingLocation];
Now move to Coding part.
.h file
#import <UIKit/UIKit.h>
#import <CoreLocation/CoreLocation.h>
@interface MyLocationController : UIViewController <CLLocationManagerDelegate>
{
CLLocationManager *locationManager;
}
@end
.m file
- (void)viewDidLoad
{
locationManager = [[CLLocationManager alloc] init];
locationManager.delegate = self;
locationManager.desiredAccuracy =kCLLocationAccuracyNearestTenMeters;
//kCLLocationAccuracyBestForNavigation;// use high level of accuracy including additinal sensor data,this level of accuracy is intended solely to use when device is connected with exteranl power supply.
// kCLLocationAccuracyBest -- highest level of accuracy for device running on batter power
// kCLLocationAccuracyHundredMeters - accurate within 100 meter
// kCLLocationAccuracyKilometer - accurate within km
// kCLLocationAccuracyNearestTenMeters - accurate within 10 meter
// kCLLocationAccuracyThreeKilometers - accurate within 3 km
//-------------------
locationManager.distanceFilter = 30.48f; //mts for 100 feet
[locationManager startUpdatingLocation];
}
// for ios5 it is deprecated in ios6
- (void)locationManager:(CLLocationManager *)manager didUpdateToLocation:(CLLocation *)newLocation fromLocation:(CLLocation *)oldLocation
{
//NSLog(@"didUpdateToLocation: %@", newLocation);
CLLocation *currentLocation = newLocation;
if (currentLocation != nil) {
AppDelegate *appD = [[UIApplication sharedApplication] delegate];
Location *objLocation = [NSEntityDescription insertNewObjectForEntityForName:tblLocation inManagedObjectContext:appD.managedObjectContext];
//NSLog(@"%@",[NSString stringWithFormat:@"%f", currentLocation.coordinate.latitude]);
objLocation.latitude = [NSString stringWithFormat:@"%f", currentLocation.coordinate.latitude];
objLocation.longitude = [NSString stringWithFormat:@"%f", currentLocation.coordinate.longitude];
objLocation.timeStamp = [dateFormater stringFromDate: [NSDate date]];
NSLog(@"latittude:%@,longitude%@",objLocation.latitude,objLocation.longitude);
}
}
-(void)locationManager:(CLLocationManager *)manager didEnterRegion:(CLRegion *)region
{
NSLog(@"Enter Region");
}
-(void)locationManager:(CLLocationManager *)manager didStartMonitoringForRegion:(CLRegion *)region
{
NSLog(@"Start Monitoring Region");
}
-(void)locationManagerDidResumeLocationUpdates:(CLLocationManager *)manager
{
NSLog(@"Resume Location update");
}
// Change set ios6 location manager above is depreciated-------
-(void)locationManager:(CLLocationManager *)manager didUpdateLocations:(NSArray *)locations
{
CLLocation *curr=[locations lastObject];
// NSDate *eventDate=curr.timestamp;
// NSTimeInterval howEvent=[eventDate timeIntervalSinceNow];
// if(abs(howEvent) <15.0)
// {
if(curr!=nil)
{
AppDelegate *appD = [[UIApplication sharedApplication] delegate];
Location *objLocation = [NSEntityDescription insertNewObjectForEntityForName:tblLocation inManagedObjectContext:appD.managedObjectContext];
//NSLog(@"%@",[NSString stringWithFormat:@"%f", currentLocation.coordinate.latitude]);
objLocation.latitude = [NSString stringWithFormat:@"%f", curr.coordinate.latitude];
objLocation.longitude = [NSString stringWithFormat:@"%f", curr.coordinate.longitude];
objLocation.timeStamp = [dateFormater stringFromDate: [NSDate date]];
lat=curr.coordinate.latitude;
lon=curr.coordinate.longitude;
}
// }
NSLog(@"%f,%f",curr.coordinate.longitude,curr.coordinate.latitude);
}
Wednesday, June 26, 2013
Store image in Document Directory and Retrieve it in iOS
In this Example i will show how to store image in document directory and Retrieve it.
Following Method we will use to store.
1.NSSearchPathForDirectoriesInDomains : Creates a list of directory search paths. Creates a list of path strings for the specified directories in the specified domains. The list is in the order in which you should search the directories. If expandTilde is YES, tildes are expanded as described in stringByExpandingTildeInPath. You should consider using the NSFileManager methods URLsForDirectory:inDomains: and URLForDirectory:inDomain:appropriateForURL:create:error:. which return URLs, which are the preferred format.
Let Start
here imgData is in NSData Format.
>>Storing image in document Directory.
>> Retrieve Image from document Directory
Following Method we will use to store.
1.NSSearchPathForDirectoriesInDomains : Creates a list of directory search paths. Creates a list of path strings for the specified directories in the specified domains. The list is in the order in which you should search the directories. If expandTilde is YES, tildes are expanded as described in stringByExpandingTildeInPath. You should consider using the NSFileManager methods URLsForDirectory:inDomains: and URLForDirectory:inDomain:appropriateForURL:create:error:. which return URLs, which are the preferred format.
Let Start
here imgData is in NSData Format.
>>Storing image in document Directory.
NSData *imgData=UIImagePNGRepresentation([UIImage imageNamed:@"Test.png"]);
NSArray *paths = NSSearchPathForDirectoriesInDomains(NSDocumentDirectory, NSUserDomainMask, YES);
NSString *documentsDirectory = [paths objectAtIndex:0];
NSString *localFilePath= [documentsDirectory stringByAppendingPathComponent:[NSString stringWithFormat:@"frame_%d.jpeg",1]];
NSLog(@"local file path at save --------------- %@",localFilePath);
[imgData writeToFile:localFilePath atomically:YES];>> Retrieve Image from document Directory
NSArray *paths = NSSearchPathForDirectoriesInDomains(NSDocumentDirectory, NSUserDomainMask, YES);
NSString *documentsDirectory = [paths objectAtIndex:0];
NSString *localFilePath= [documentsDirectory stringByAppendingPathComponent:[NSString stringWithFormat:@"frame_%d.jpeg",1]];
UIImage *givenImage = [UIImage imageWithContentsOfFile:localFilePath];
NSData *myimg = UIImageJPEGRepresentation(givenImage,0.5);
UIImageView *img=[[UIImageView alloc] initWithFrame:CGRectMake(0, 0, 200, 200)];
img.image=[UIImage imageWithData:myimg];
[self.view addSubview:img];
Sunday, June 16, 2013
Get Size and Resolution of iOS Device
In the Example I will show you how you get Actual Pixel Resolution and size of iOS Device by coding.
Just you have to find the Screen size bound and scale.
Just you have to find the Screen size bound and scale.
CGRect rect=[[UIScreen mainScreen] bounds];
CGFloat scale=[[UIScreen mainScreen] scale];
NSLog(@"Actual Pixel Resolution: width :% f,height :%f",rect.size.width * scale,rect.size.height * scale);
NSLog(@" Actual Size width :% f,height :%f",rect.size.width ,rect.size.height );
O/P
For retina 4-inch display
Actual Pixel Resolution: width : 640.000000,height :1136.000000
Actual Size width : 320.000000,height :568.000000
Monday, June 10, 2013
Move or Delete UiTableViewCell in iOS
In this example i will show how to move or delete cell in TableView.
First take UiTableView, allocate it datasource and delegate to File's Owner.
.h
.m
ViewDidLoad.
[NSArray arrayWithObject:indexPath]
}
First take UiTableView, allocate it datasource and delegate to File's Owner.
.h
#import <UIKit/UIKit.h>
@interface FavouriteListVC : UITableViewController
-(IBAction)btnEdit:(id)sender;
@end
.m
ViewDidLoad.
- (void)viewDidLoad
{
[super viewDidLoad];
UIBarButtonItem *btn=[[UIBarButtonItem alloc]initWithTitle:@"Edit" style:UIBarButtonItemStyleBordered target:self action:@selector(btnEdit:)];
btn.tag=10;
self.navigationItem.rightBarButtonItem=btn;
}
-(IBAction)btnEdit:(id)sender
{
int tag=[sender tag];
if(tag==10)
{
[self.tableView setEditing:YES animated:YES];
[sender setTitle:@"Done"];
self.editing=YES;
[sender setTag:11];
}
else
{
[self.tableView setEditing:NO animated:YES];
[sender setTitle:@"Edit"];
[sender setTag:10];
}
}
-(void)tableView:(UITableView *)tableView moveRowAtIndexPath:(NSIndexPath *)sourceIndexPath toIndexPath:(NSIndexPath *)destinationIndexPath
{
NSObject *obj=[self.favList objectAtIndex:sourceIndexPath.row];
if(destinationIndexPath.row>sourceIndexPath.row)
{
for(int x=destinationIndexPath.row;x>sourceIndexPath.row;x--)
{
[self.favList replaceObjectAtIndex:x-1 withObject:[self.favList objectAtIndex:x]];
}
}
else
{
for(int x=destinationIndexPath.row;x<sourceIndexPath.row;x++)
{
[self.favList replaceObjectAtIndex:x+1 withObject:[self.favList objectAtIndex:x]];
}
}
[self.favList replaceObjectAtIndex:destinationIndexPath.row withObject:obj];
}
-(BOOL)tableView:(UITableView *)tableView canMoveRowAtIndexPath:(NSIndexPath *)indexPath
{
return YES;
}
-(void)tableView:(UITableView *)tableView commitEditingStyle:(UITableViewCellEditingStyle)editingStyle forRowAtIndexPath:(NSIndexPath *)indexPath
{
if(editingStyle==UITableViewCellEditingStyleDelete)
{
[self.favList removeObjectAtIndex:indexPath.row];
[tableView deleteRowsAtIndexPaths:
[NSArray arrayWithObject:indexPath]
withRowAnimation:UITableViewRowAnimationFade];
}
}
Subscribe to:
Posts (Atom)